Westinghouse 7867865 Installation Guide
Browse online or download Installation Guide for Unknown Westinghouse 7867865. Westinghouse 7867865 Installation Guide User Manual
- Page / 12
- Table of contents
- BOOKMARKS
- PREPARING FOR INSTALLATION 1
- ANTES DE LA INSTALACIÓN 1
- MOUNTING BRACKET INSTALLATION 2
- Elija una OPCIÓN DE MONTAJE 3
- Choose a MOUNTING OPTION 3
- FLUSH MOUNT OPTION 4
- OPCIÓN DE INSTALACIÓN AL RAS 4
- UL-ES-Vintage-WH09 5
- EXTENDED DOWNROD OPTION 6
- MOUNTING 8
- WIRING OPTIONS 9
- OPCIÓN DE CABLEADO 9
- SECURE TO CEILING 10
- BLADE INSTALLATION 11
- INSTALACIÓN DE LAS PALETAS 11
- 20 21 22 12
- LIGHT FIXTURE INSTALLATION 12
Summary of Contents
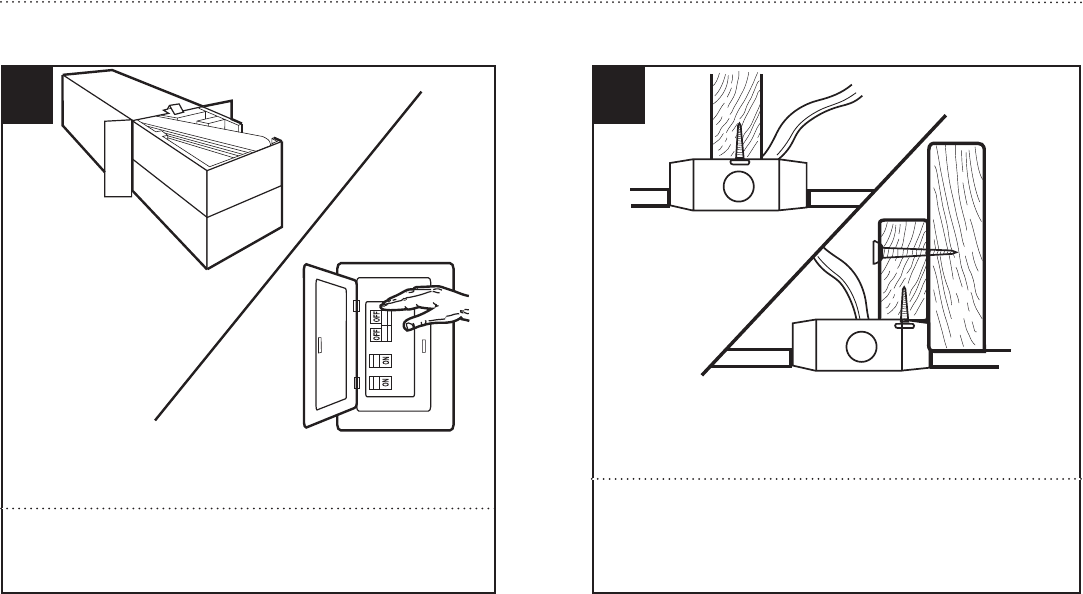
6UL-ES-Vintage-WH09Unpack and inspect fan carefully to be certain all contents are included. Turn off power at fuse box to avoid possible electrical s
15UL-ES-Vintage-WH09SECURE TO CEILINGASEGURE EL VENTILADOR AL CIELORRASOThe canopy has two mating slots (1) and two mating holes (2). Position both sl
16UL-ES-Vintage-WH09Check the motor for plastic shipping stabilizer tabs (1), and remove them if they are present. Attach blade assembly to motor usin
17UL-ES-Vintage-WH0920 21 22Install shades to light kit by finger-tightening the screws for each shade holder as shown. Do not overtighten screws. In
7UL-ES-Vintage-WH09MOUNTING BRACKET INSTALLATIONINSTALACIÓN CON SOPORTE DE MONTAJE3Remove the screws and star washers from the two mating holes (1) on
8UL-ES-Vintage-WH09MOUNTING BRACKET INSTALLATIONINSTALACIÓN CON SOPORTE DE MONTAJEInstall mounting bracket to outlet box in ceiling using the screws a
99UL-ES-Vintage-WH09FLUSH MOUNT OPTIONOPCIÓN DE INSTALACIÓN AL RAS6Guide motor wires through the base of the canopy as shown and attach canopy directl
10UL-ES-Vintage-WH098213Feed motor lead wires through downrod/canopy assembly and insert downrod into downrod yoke. Make sure to align hole in downrod
11UL-ES-Vintage-WH09EXTENDED DOWNROD OPTIONOPCIÓN CON VARILLA VERTICAL MÁS LARGA10Slide downrod ball (1) off of downrod and remove pin (2). Deslice la
12UL-ES-Vintage-WH0912Feed motor lead wires through downrod/canopy assembly and insert downrod into downrod yoke. Make sure to align hole in downrod w
13UL-ES-Vintage-WH09MOUNTINGMONTAJE14With bracket holding fan assembly, make electrical connections using the following step for wiring instructions.C
14UL-ES-Vintage-WH09WIRING OPTIONSOPCIÓN DE CABLEADO16White (common)Black (hot)Blue* (hot)Main (ground)White (common)Fan Switch (hot)Light Switch (hot
More documents for Unknown Westinghouse 7867865

Related products and manuals for Unknown Westinghouse 7867865

 (1 pages)
 (2 pages)
© 2020, manymanuals.com. All rights reserved. | 1.287 s |
 Manymanuals.com
 Manymanuals.de
 Manymanuals.fr
 Manymanuals.it
 Manymanuals.pl
 Manymanuals.cz
 Manymanuals.es
 Manymanuals-pt.com
Comments to this Manuals